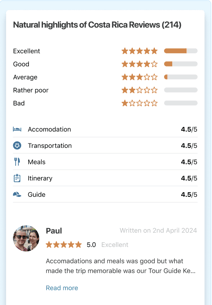
One of the most popular widgets TourRadar offers is our 'Review' widget. A review widget is an interactive tool on websites that showcases customer feedback. It enhances trust, improves SEO, influences purchases, and provides you with valuable insights to refine your services and customer relationships. TourRadar offers review widgets for both you as an operator and for the specific adventures you offer.

Generate Widget Video
Steps to Generate 'Review' Widget
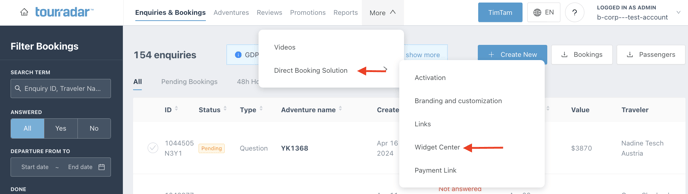
- Log into your Operator Dashboard, click on the 'more' tab, then 'Direct Booking Solution', and select 'Widget Center'.
- Select the 'Reviews' widget for adventure-specific reviews, for overall company reviews select 'Company reviews block' clicking your unique TourRadar widget, you will be able to see a preview of what it will look like. After previewing, click 'Next' in the top right corner.


- After clicking, you can customize your TourRadar widget to fit your preferences.
- For the adventure-specific 'Reviews' widget, you can customize the specific adventure the widget applies to.
- For the 'Company reviews block', you can customize whether the widget size is large or small


4. After customizing, scroll down and select 'Preview Widget' to ensure it's formatted to your preferences. Afterwards, select 'Generate code' to get the code to integrate your widget. Clicking 'Generate code' will automatically take you to the next step of the integration process.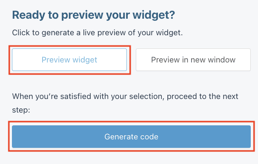
5. You can now integrate your new widget using the Embed option below.
Steps to Integrate 'Reviews' Widget
Embed Widget Integration
- Choose the location for your widget: Decide on your webpage where you want the TourRadar widget to appear. Once you decide, create the respective element (button, text line etc.) in your CMS (popular CMS's include: Wordpress, WIX, or Squarespace.). This could be anywhere in the <body/> section of your HTML document.
-
- CMS stands for Content Management System and is a software application that allows users to create, manage, and modify content on a website without the need for specialized technical knowledge.
- CMS stands for Content Management System and is a software application that allows users to create, manage, and modify content on a website without the need for specialized technical knowledge.
-
- Copy the Code: In the location where you want the widget to appear, copy and insert the code from the widget center in your Operator Dashboard.

TourRadar offers a ‘Download All’ option for integration codes, letting you get the code for a particular widget in one batch for all adventures. This option is available for all Adventure-Specific widgets. Find out more information here.
For specific CMS integration steps, follow the steps in the articles below:
If you are having problems integrating your TourRadar Widget(s), please email us at partner-solutions@tourradar.com with more information about the situation.